Friday, May 1, 2009

Commonalities In Construction

Throughout the construction industry, many similarities between projects within each different sector can be found. However, there are also obviously some differences as each respective company has developed their own system and methodology.

For this exercise I will focus on the commonalities between projects within the commercial sector, although there are many similarities with projects within other sectors.

  • As is the case with both the basketball practice facility and the new dorm, the owner always has a specific purpose in mind for the completed building, and the building is designed and built to facilitate that intent.
  • As many commercial projects are large and complex, site organization and layout are very critical--among the common concerns are providing adequate parking space for employees, visitors, and deliveries. Large machinery and equipment must be able to not only enter/exit the site, but must also be able access each location it is needed in. Proper surfacing of the site must also be considered so that large puddles don't form and equipment does not sink into mud.
  • Typically, heavy equipment is utilized throughout different stages of each project. This can put a strain on the budget if the project falls behind schedule and equipment is left idle, considering the daily rate to rent a large crane can be crippling. This is one of many reasons why proper time management and planning is imperative to the success of a project.
  • Communication is vital to each and every project--between the owner and the design team, the designers and the constructors, the contractor and the subs, the subs and the suppliers, etc.--and no project will be successful without a system in place where that is the case.

Wednesday, March 18, 2009

Industry Day


On Tuesday morning (03/17) I visited Industry Day by Squires.

The first person I talked to was Stacy from Chandler, Inc., based out of Christiansburg, VA. He explained how although the maximum capacity of the cement truck (photo at right) was around 10.5 cubic yards, the maximum allowed traveling capacity is limited to 8.5 to 9 cubic yards. We talked about the impact the economy has had on their plant, and he said that they are only operating 4 days a week.


The other truck that Chandler, Inc. had with
them was a flatbed truck with a 3-wheeled
Bobcat loaded on the back. Strapped to the
truck bed were some metal "racks"
(photo at right).


The next location I went to was right next to Squires/bookstore where a crane was set up. The crane operator had recruited a couple guys to help do lead lines and tie-offs for him. His job was to lift the top half of a pre-fab light-gage structure--complete with HVAC, lighting, and water pipes--onto the bottom half. He told the group of us watching him that the crane could lift 2,700 lbs. at the current 72' radius, and then proceeded to slowly lift and manuever the top half onto the bottom. The top half was then secured with screws at each corner. (See photos below).


Prof. Mills hard at work (photo at right).


Next, I visited the American Infrastructure trailer where the bull dozer simulator was located. The representative shared how they use Teramall software from Trimble, which makes it possible to upload 3D AutoCAD site plans into the software, and use it in bulldozers and other equipment for precise grading & earth work. He estimated that the set-up in the trailer--including TV's, laptops, software, etc.--cost around $45,000, and that the trailer itself cost around $25,000 including the cost of AC and other upgrades. Although I didn't do the simulator myself, I watched a couple other guys working it (See pictures below).


I visited the Spectra I.S. booth last and listened as the two representatives explained how their company is changing the face of how site work and grading is accomplished. Their Trimble products use GPS and robotic technologies to effectively take all guesswork out site management. Their products make it possible for anyone back at the office to see where all machines and equipment are located in real-time. He described how they allow all parties involved to visualize and see sitework progress as it happens. The software is also capable of generating 3D as-built updated drawings as work is being completed. One of the primary products they develop is the Trimble TSC2 Controller which is essentially a powerful handheld computer which is completely wireless. Although it took him some time to boot it up, he showed us an example of an entire project loaded onto it.

He stressed how the so-called point to point system of surveying and site work is going to be a thing of the past. He also mentioned that American Infrastructure is one of the biggest users of 3D modeling in the insdustry. (See photos below).


Monday, March 2, 2009

Bedroom plan/section


These sketches of my bedroom show a pretty typical representation of the components of residential construction.

The bedroom floor joists are assumed to be 2x10 joists, with 1/2" plywood on top and carpet finish. The walls are assumed to be 2x4 stud walls @ 16" oc with 1/2" APA rated sheathing and vinyl siding on the exterior and drywall on the interior.

The door opening is supported by a (2)2x8 header with 1 layer of 1/2" plywood in between. The door frame and trim are very typical. Supporting the pre-engineered trusses above the window is a (2)2x8 header also with a layer of 1/2" plywood in between (the plywood is included to create a uniform wall width). The double-hung window has a typical aluminum frame.

Bishop Favrao Hall 3rd Floor sketch at drip pan


At right is an isometric sketch of the structural/MEP system at the 3rd floor drip pan in Bishop Favrao Hall.

Moving from top to bottom:

Supporting the steel pan above is a steel beam framed into a steel girder beam with a bolted connection. Attached to the bottom of the steel beam is a distribution box. Hanging from the steel pan by metal rods is the duct pipes along with the entire drip pan frame. Corrugated wires extend from a component of the drip pan up to a distribution box attached to the steel pan above. Also in the vicinity are several water pipes and a sprinkler system. In addition, hanging from metal wires are two flourescent light units.

Bishop Favrao Hall interior stair details


As noted in the post above, the stair pictured at right is a pre-fabricated steel structure with cast-in-place concrete treads.

Bishop Favrao Hall interior stair section/plan


At right is the stair plan & section of the 1st-2nd floor stairway in the Northwest corner of Bishop Favrao Hall.

The stair structure itself is primarily steel, with concrete treads. Supporting the concrete landing and steel pan is a steel channel running perpendicular to the stair, and a small steel angle running parallel to the stair. The steel stringers extend to the cmu walls on the top and bottom of the stairs. The concrete treads are supported by a "Z" shape steel pre-fabricated tread. In turn, the same pre-fabricated treads are supported at either end by a steel strap welded to the stringer and bottom of the treads.

An assumption was made as to how the bottom concrete landing is supported, but in this sketch, the slab/steel pan is supported by an angle welded to a channel at the stair end, and by a channel bearing on the cmu wall (at either end of the channel).

Above the stairs is a handrail supported at 5 places. Also shown is a sprinkler system pipe.

Perry Street mock-up wall assembly sketches


Shown at right is an elevation and 2 sections of the mock-up wall assembly on Perry Street. The wall is 13 cmu courses high, with the top 9 units being 8" thick and the bottom 4 units at approx. 12" thick. Applied on the front face of the cmu wall is rigid insulation and a water-proofing membrane. The bottom of the wall has 2 rows of cast stone panels supported by a cmu block. On top of the panels is a cast stone sill. The front face of wall above the sill is a Hokie stone facade.

On the right side of the wall is a window opening, with no Hokie stone. Beneath the window frame is a textured cast stone accent panel. The entire assembly rests on a concrete foundation.

Sunday, March 1, 2009

Unit Cost Estimate


Above: Unit Cost Estimate with qty 1


Above: Unit Cost Estimate with qty added

The process to create the unit cost estimate was quite similar to the assembly cost estimate, except that instead of whole assemblies being used, each component of the project was quantified. For example, instead of just listing "concrete perimeter footing", the assembly was broken down into components such as chairs, excavation, reinforcing, etc.

Similar to the assembly cost estimate, I selected multiple options for each unit and decided which worked the best once I had exported to Excel. I also had to manipulate some of the costs based on slightly different sizes available on RS Means.

Tuesday, February 24, 2009

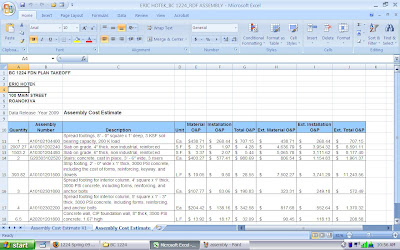
Assembly Cost Estimate


Above: Assembly Cost Estimate with qty added


Above: Assembly Cost Estimate with qty 1

The process of using RS Means to produce the assembly cost estimate linked above was a very tedious one. The site layout/format itself was good, but my computer's connection with the site was terrible, as each attempt to navigate would result in a long lag time. However, that aside, the process was straightforward. Using two methods to locate the assemblies needed--the search bar and the "tree" expand option--I was able to find slabs, walls, footings, etc. I selected two options for each assembly needed and then chose which one was the better choice once I had exported to Excel. Even after choosing the better option, some manual editing was still required as sizes did not always match. I broke the cost down into dollars per 1 unit (whether it be SF, CF, CY, etc.) and then calculated the new cost for the updated size.

Commercial Wall Section


http://www6.district125.k12.il.us/teched/Images/Com.-Wall-Section-2.gif

Above is a commercial building exterior wall section. The substructure is a typical concrete footing with key way supporting a concrete foundation wall with key. Beneath the column is a concrete pad, and supporting the slab is a concrete pilaster. The top of concrete slab matches top of concrete foundation wall. Underneath the concrete slab is rigid insulation, poly vapor barrier, and a layer of gravel.

The superstructure is a mix of steel components and concrete: The exterior wall is concrete with steel columns at intervals along it. The wall has rigid insulation installed on the exterior and a brick facade separated from the insulation with an air gap. Steel beams bearing on the steel columns support steel roof rafters. The flat roof is composed of steel decking bearing on the roof rafters, rigid insulation, and a built up layer of tar and gravel on top. Extending slightly above the top of roof level is a steel stud wall with a treated wood block on top capped with a stainless steel member. Flashing is installed to seal the roof/wall connection. Hanging from the roof rafters is a drop ceiling.

BC 1224 TUESDAY CLASS

HERE